
Understanding the Wholesale Customer Portal: Customer POV
Copy and Paste this article. Then enter Your Bakery LOGO - Contact INFO - Hours of operations etc to Customize this article for your customers. Everything below is geared toward speaking to your customer as the articles audiance.
Your customers can use the Wholesale Portal for the following things.
Use the portal to:
- Place wholesale orders
- Manage recurring deliveries
- Review submitted orders
- View and pay invoices
- Manage account access online
1. Getting Started
Accepting Your Invitation
Before logging in for the first time, you’ll receive an invitation email from your vendor.
To activate your account:
- Open the invitation email
- Click the registration link
- Create your password
- Complete setup
Your email address becomes your login username.
Logging In
Go to your vendor’s Wholesale Portal login page:
www.YOURBAKERYSUBDOMAIN.BakeSmart.com/wholesale/portal
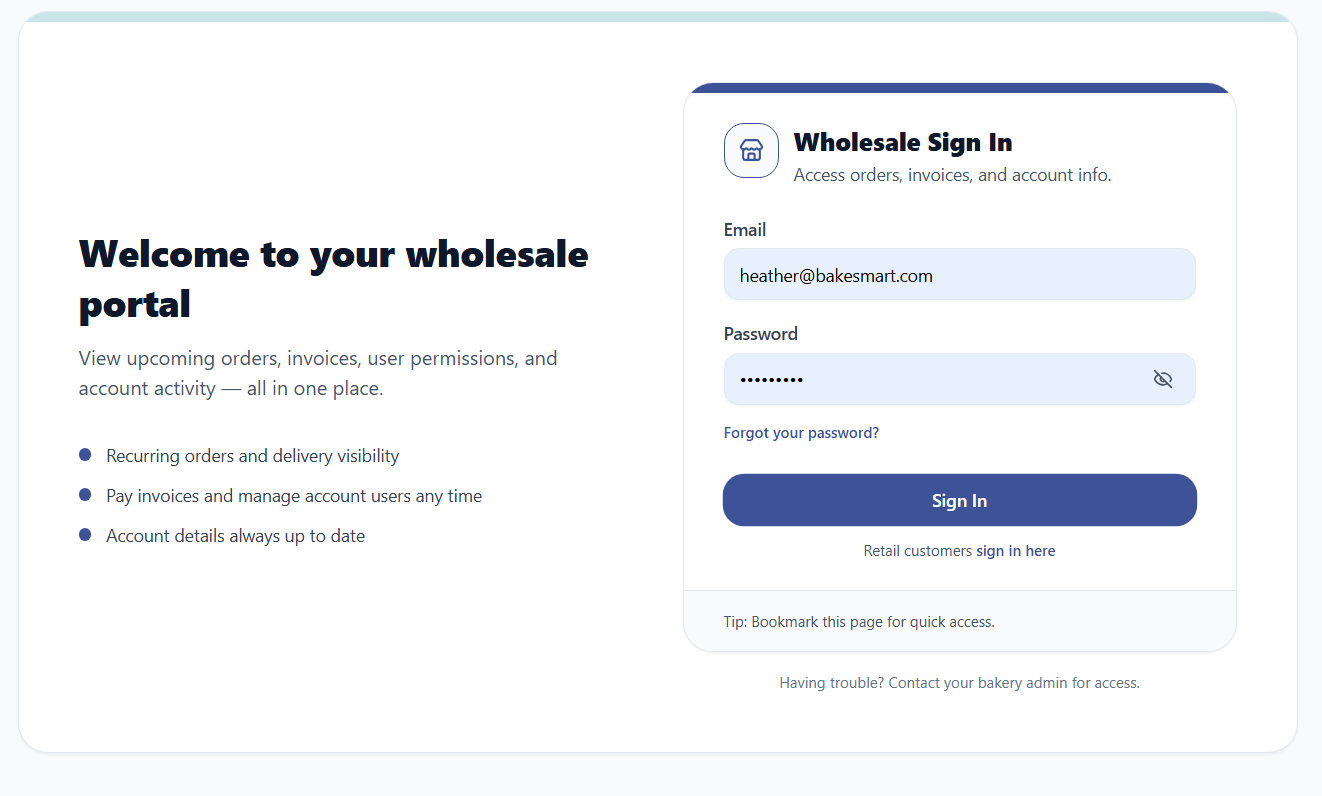
Enter:
- Your email address
- Your password
Then click Sign In.
TIP
Bookmark this page for quick access to ordering, invoices, and account management.
Forgot Your Password?
Click Forgot your password? on the login page.
A password reset email will be sent to you.
Retail vs Wholesale Login
The Wholesale Portal is separate from your vendor’s retail ordering site.
Wholesale account access is provided directly by your vendor.
2. Your Dashboard
After logging in, you’ll land on your dashboard.
Your dashboard gives you a quick overview of:
- Upcoming orders
- Open balances
- Recent activity
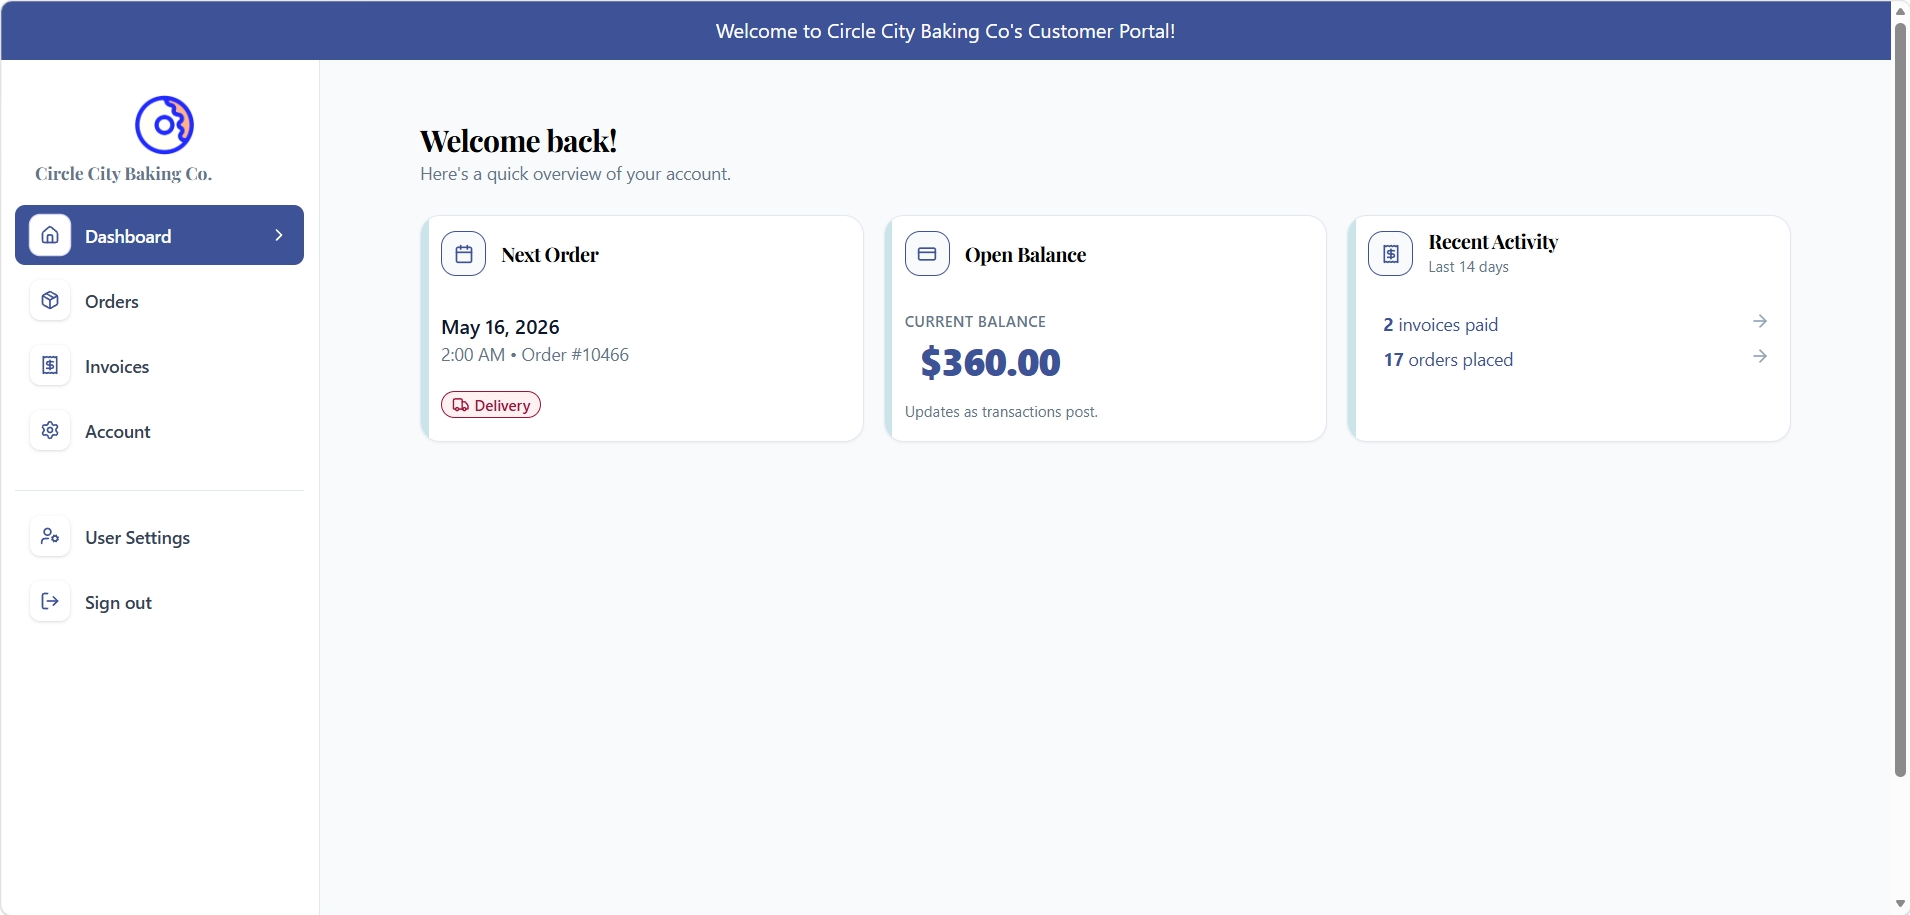
Dashboard Overview Panels
Section | Description |
Next Order | Your next scheduled order |
Open Balance | Any unpaid invoices |
Recent Activity | Recent orders and payments |
Navigation Menu
Use the navigation menu to move through the portal.
Menu Option | Purpose |
Dashboard | Account overview |
Orders | Place and manage orders |
Invoices | View and pay invoices |
Account | Account and delivery details |
User Settings | Manage additional users |
Sign Out | Log out securely |
3. Placing Orders
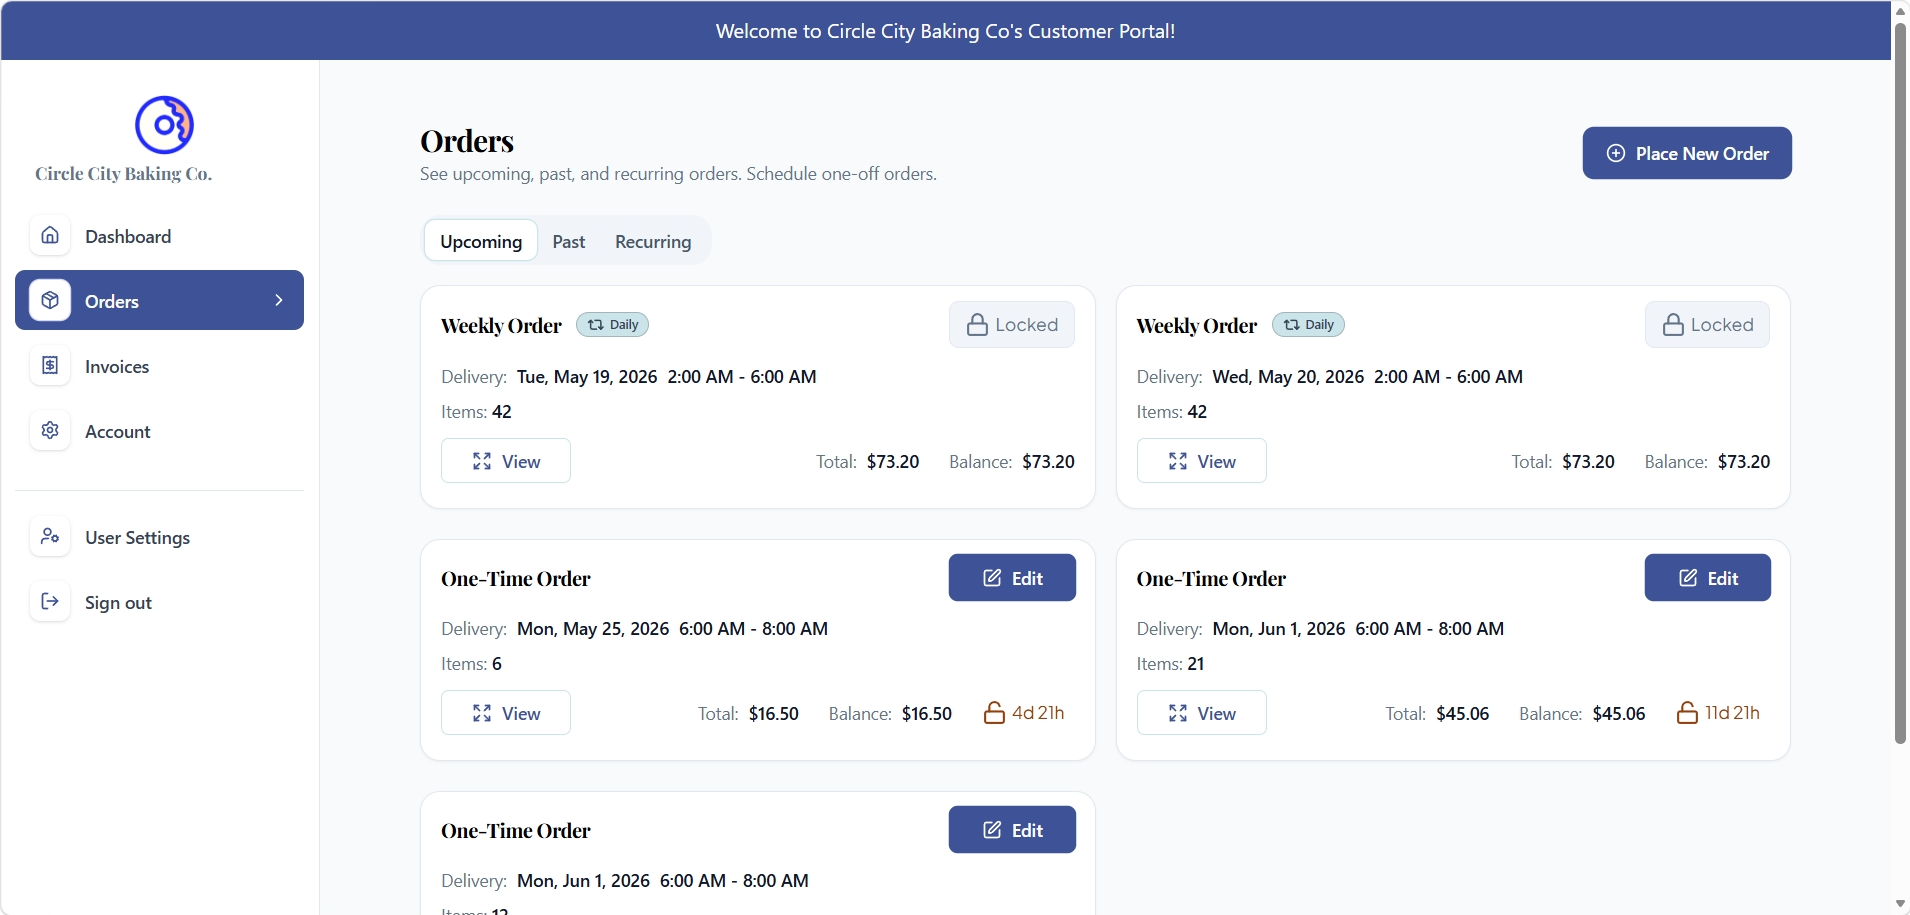
The Orders section is where you place and manage wholesale orders from your vendor.
One-Time Orders
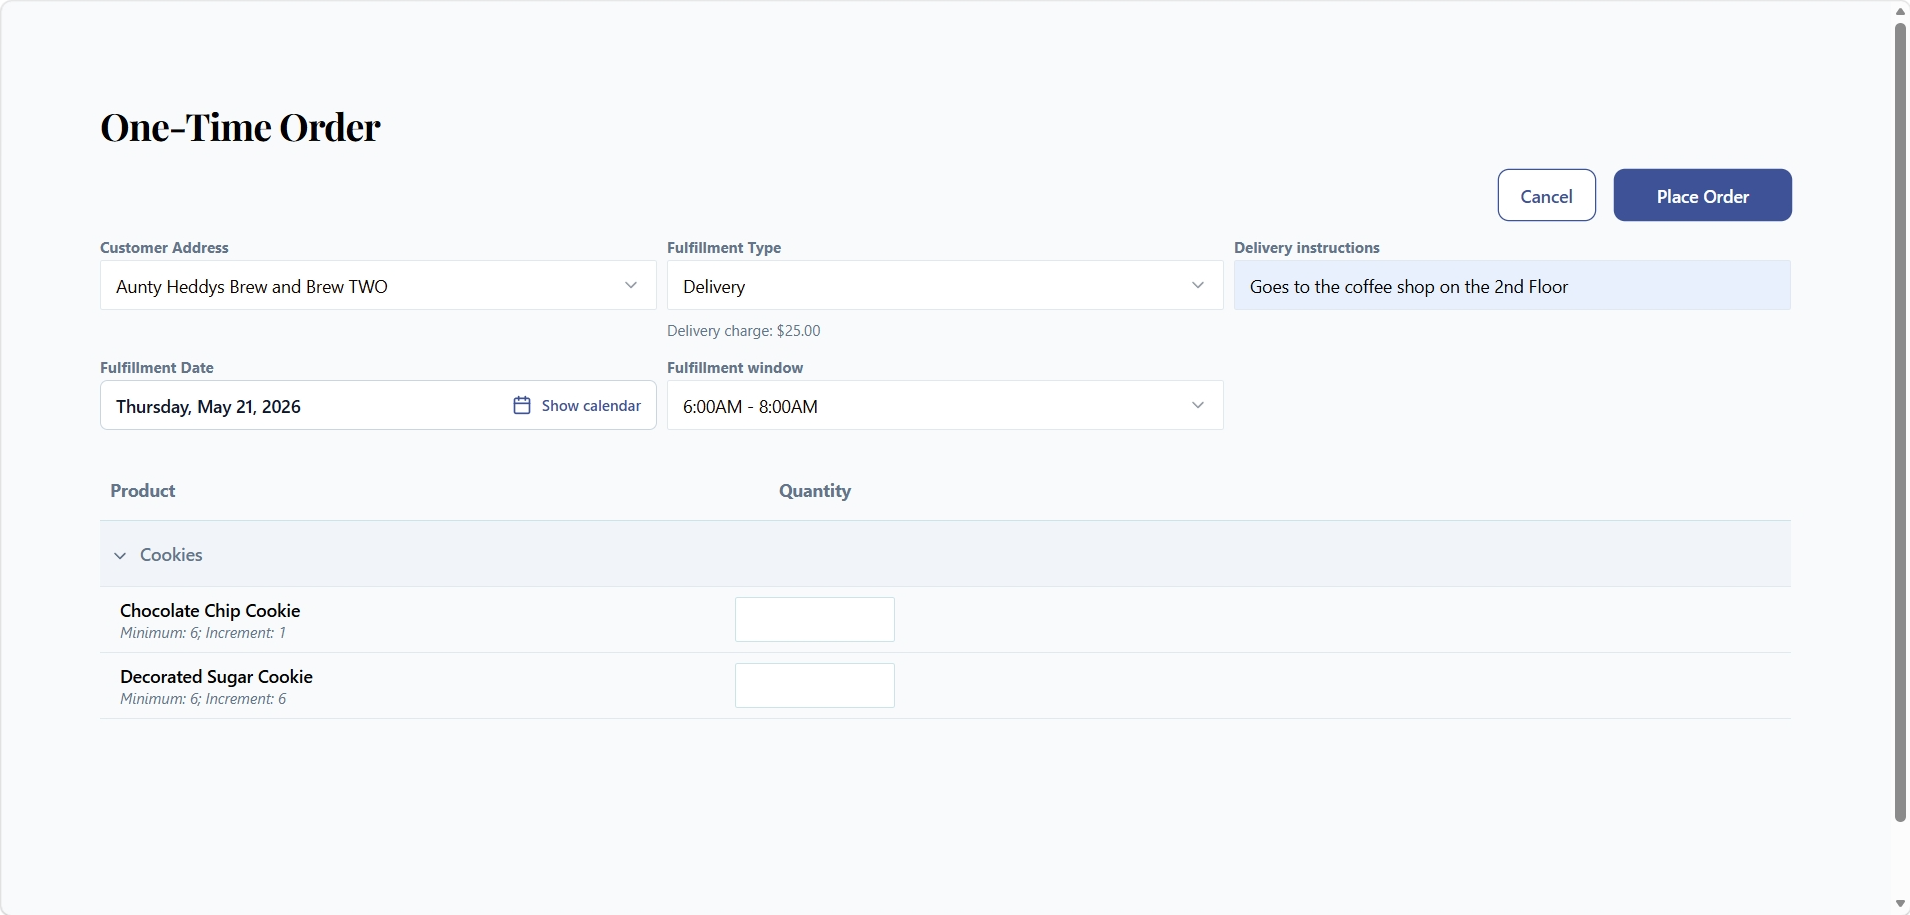
Use a One-Time Order for a single scheduled delivery or pickup.
To Place a One-Time Order
- Go to Orders
- Click Place New Order
- Select Single Order
- Choose:
- Delivery or pickup
- Fulfillment date
- Fulfillment time
- Add products and quantities
- Review your order
- Click Place Order
To Place a One-Time Order
Recurring (Standing) Orders
Recurring orders automatically repeat on the schedule you choose.
These are commonly used for:
- Standing café orders
- Daily deliveries
- Weekly restocks
- Recurring wholesale production
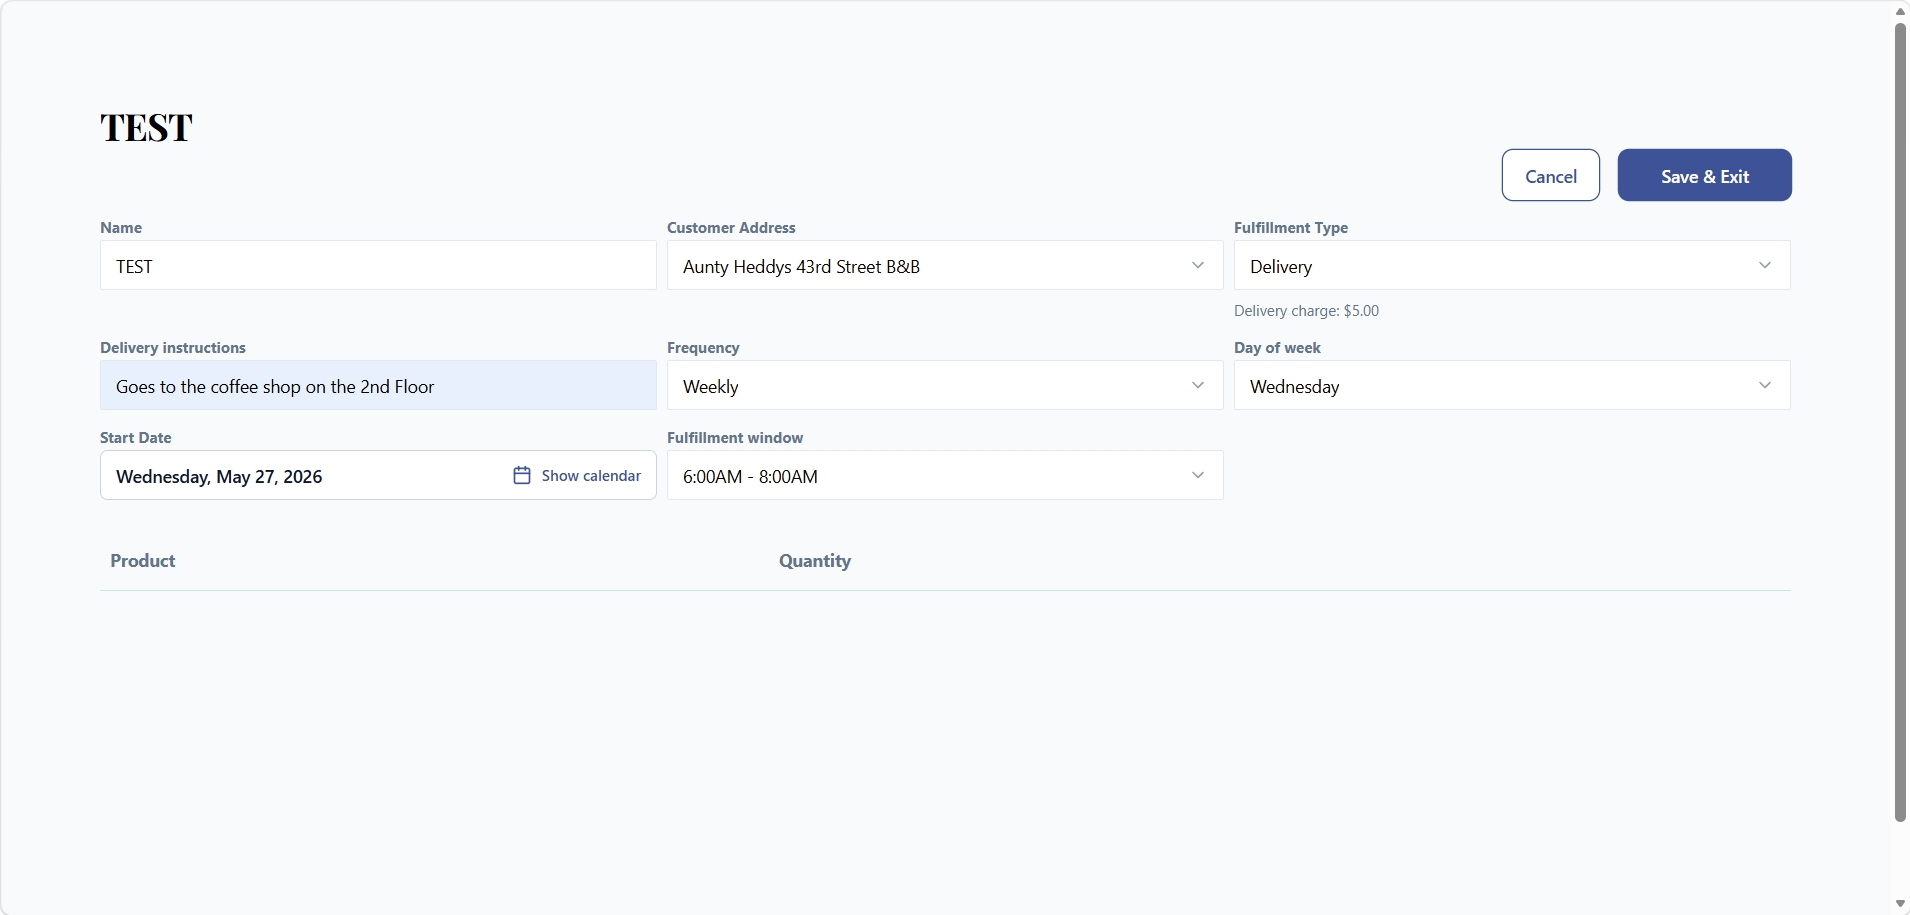
To Create a Recurring Order
- Go to Orders
- Click Place New Order
- Select Recurring (Standing) Order
- Enter an order name
- Select:
- Delivery or pickup
- Fulfillment location
- Choose your schedule:
- Daily
- Weekly
- Monthly
- Select a start date
- Add products and quantities
- Review your order
- Click Place Order
Order Cutoff Times
Orders must be submitted before your vendor’s cutoff window.
After cutoff, the order may no longer allow online changes.
If you need assistance after the cutoff, contact your vendor directly.
4. Editing Orders
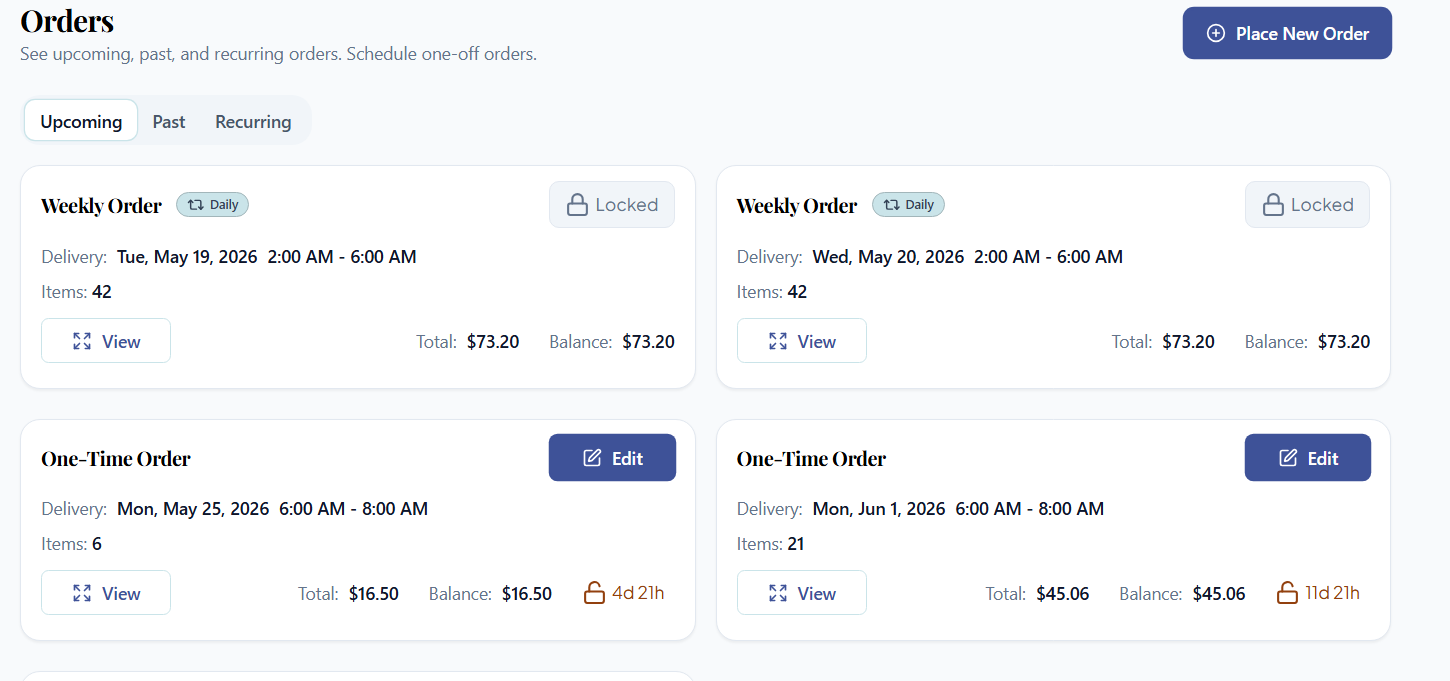
Orders may appear as either:
- Editable
- Locked
Editable Orders
Orders that are still within the allowed editing window will display:
- An Edit button
- An open padlock icon
- A countdown showing how much time remains before the order locks
Example:
4d 21h = 4 days and 21 hours remaining before edits close.
During this window, you may still:
- Adjust quantities
- Add or remove items
- Update order details
Locked Orders
Once the order cutoff window has passed, the order will display a Locked status.
Locked orders can still be viewed, but online changes are no longer available.
If changes are needed after the order locks, contact your vendor directly.
Editing Recurring Orders
Recurring orders can also be updated before the cutoff for the next scheduled delivery.
Depending on your vendor’s settings, you may be able to:
- Adjust quantities
- Add or remove items
- Update order notes
- Pause or cancel recurring schedules
Changes made after cutoff may apply to future deliveries instead.
Viewing Existing Orders
The Orders section also allows you to review orders that have already been submitted.
This can be helpful for:
- Checking delivery dates
- Reviewing item quantities
- Confirming submitted orders
- Reviewing orders before invoicing
NOTE
Past orders are view-only and cannot currently be duplicated or reordered from within the portal.
5. Viewing & Paying Invoices
Invoices are automatically generated from completed orders.
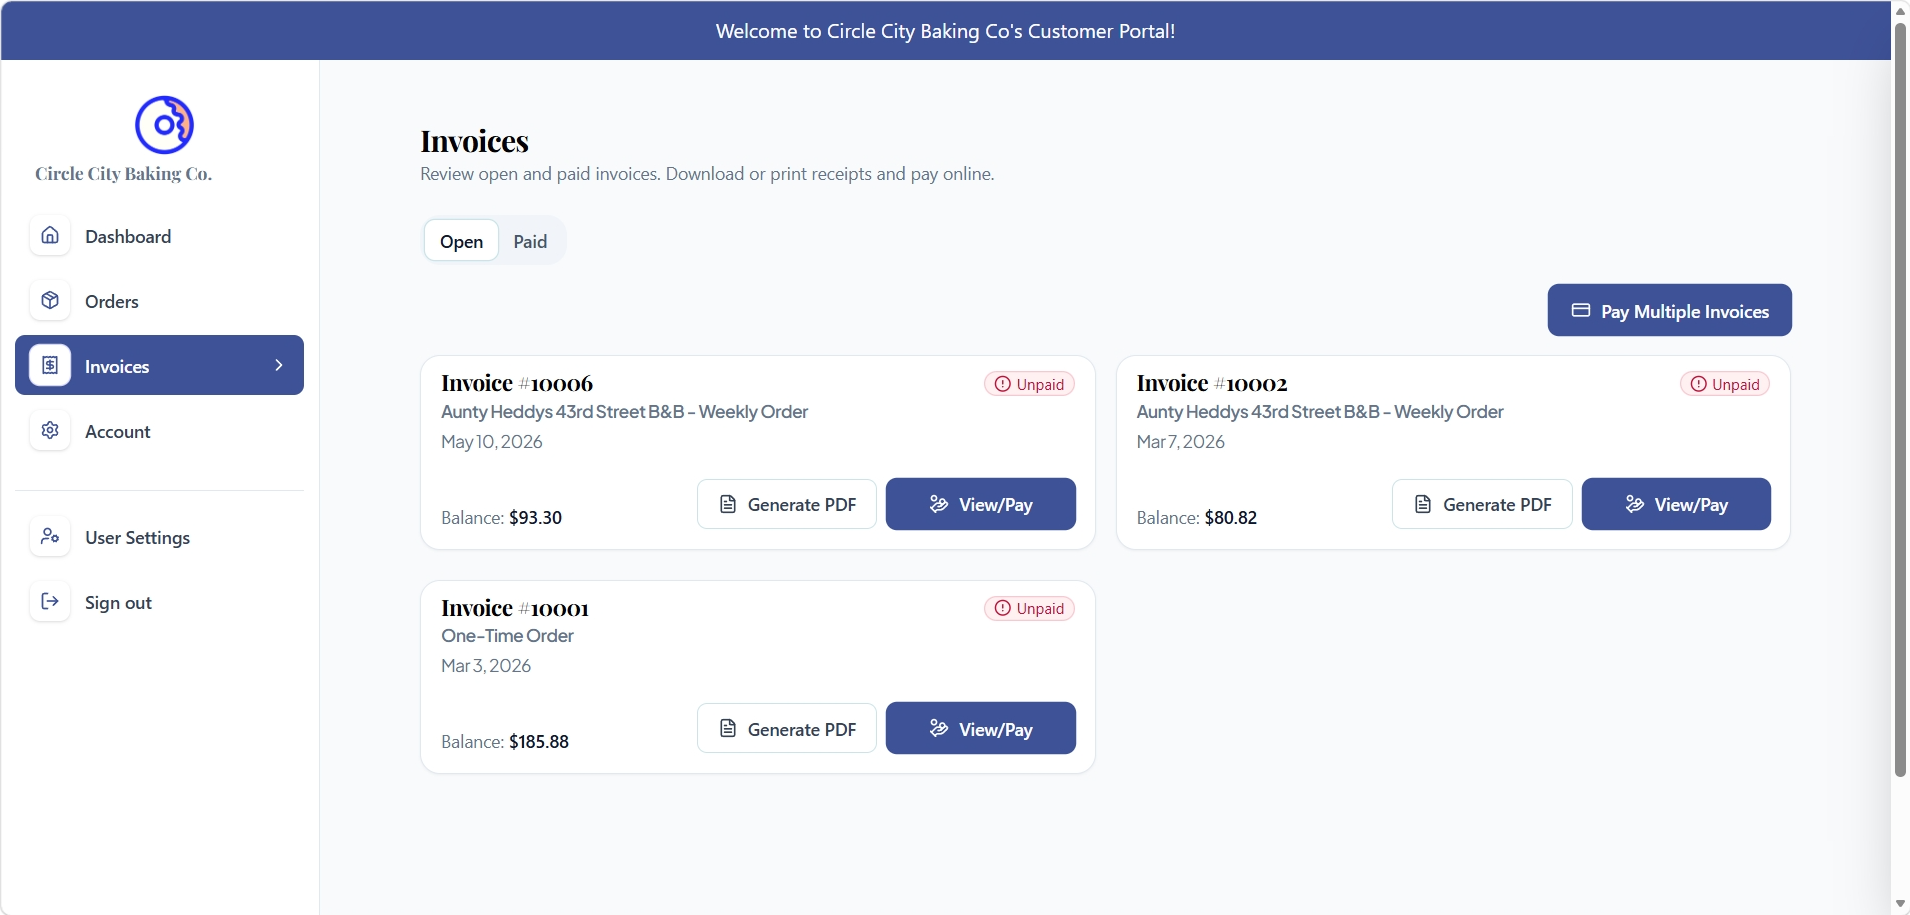
Viewing Invoices
- Go to Invoices
- Use the Open or Paid sections to filter invoices
- Click View/Pay to open invoice details
Invoice details may include:
- Ordered products
- Taxes
- Delivery fees
- Credits applied
- Remaining balance
Paying an Invoice
- Open the invoice
- Click Pay Invoice
- Select a saved card or enter a new payment method
- Complete payment
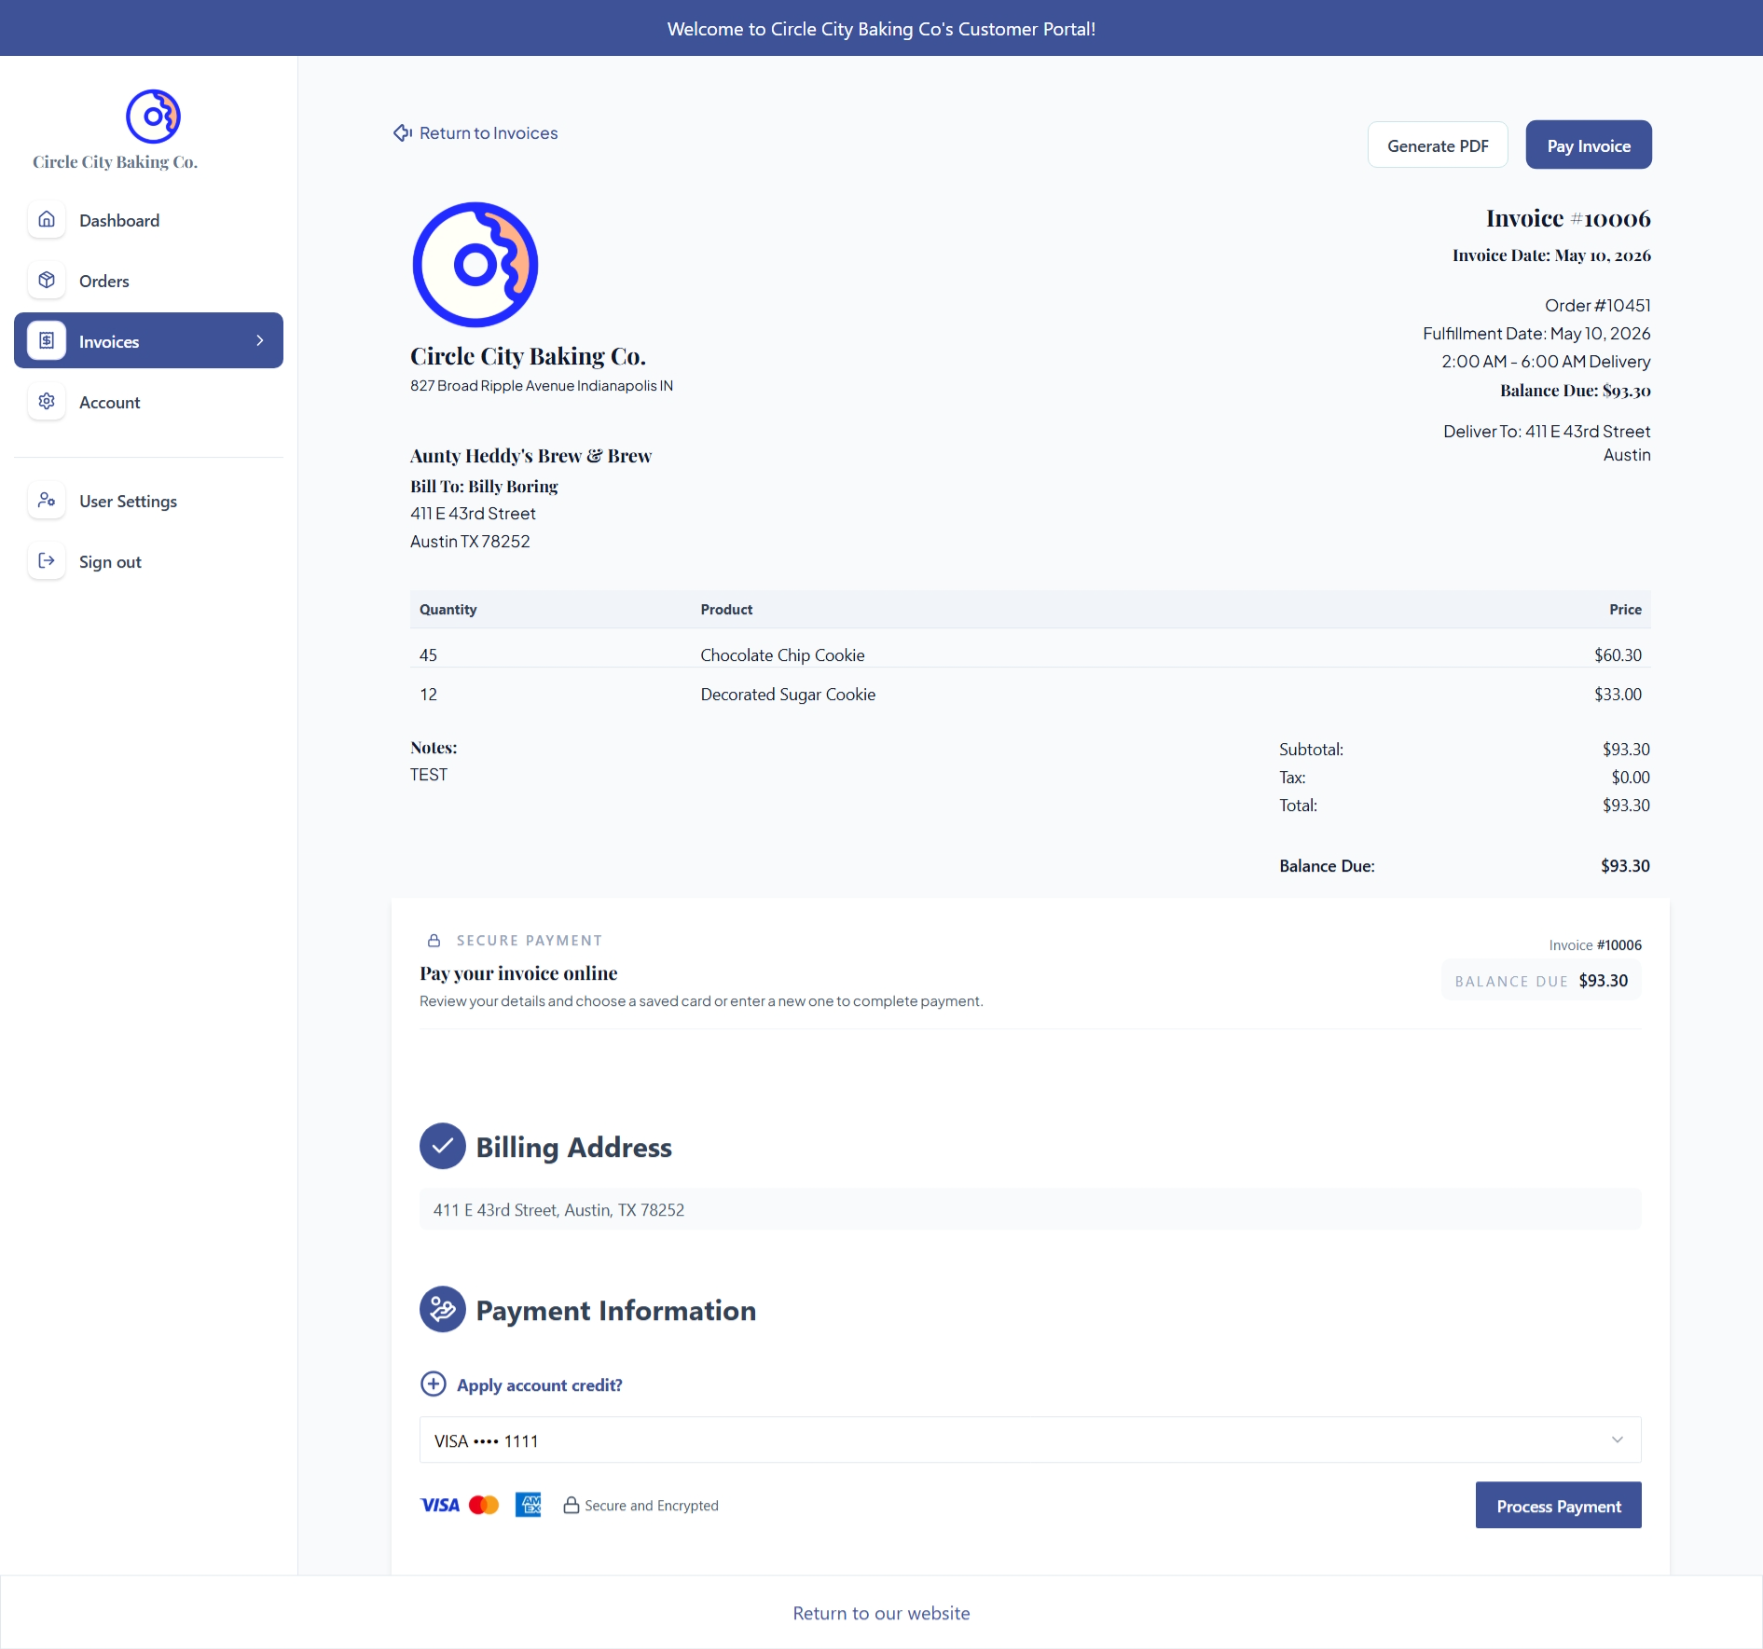
You’ll receive confirmation once payment is complete.
Paying Multiple Invoices
If enabled by your vendor, multiple invoices can be paid in a single transaction.
- Go to Invoices
- Click Pay Multiple Invoices
- Select invoices
- Complete payment
Depending on your vendor’s settings, payments may:
- Apply to oldest invoices first
- Allow invoice-by-invoice selection
- Require full invoice payment
Downloading Invoice PDFs
To download or print an invoice:
- Open the invoice
- Click Generate PDF
Invoices download as PDF files for accounting or recordkeeping.
6. Saved Cards & Account Credit
Saving a Card
When paying an invoice:
- Select New Card
- Enter payment details
- Check Save card for future use
- Complete payment
Your saved card will appear during future checkouts.
NOTE
Your vendor does not have direct access to your full card information.
Applying Account Credit
If available, account credit can be applied during payment.
- Open the invoice
- Click Pay Invoice
- Select Apply Account Credit
- Complete payment
If your credit fully covers the balance, no additional payment method may be required.
7. Managing Team Access
Multiple users can access the same wholesale account.
This is useful for:
- Managers
- Purchasing teams
- Office staff
- Additional ordering contacts
Adding a User
- Go to User Settings
- Click Add User
- Enter the user’s information
- Send the invitation
The new user will receive an email to create their password.
Removing a User
- Go to User Settings
- Locate the user
- Click Remove or Revoke Access
That user will no longer have access to your account.
Updating Account Information
To update account or delivery information:
- Go to Account
- Make your changes
- Save updates
Some account changes may require vendor approval.
Need Help?
For help with:
- Orders
- Deliveries
- Payments
- Invoice questions
- Account access
Please contact your vendor directly.
Vendor Contact Information
Vendor Name: _______________________
Portal URL: _______________________
Wholesale Contact Email: _______________________
Phone Number: _______________________
Business Hours: _______________________